Mise à jour : 31/12/23
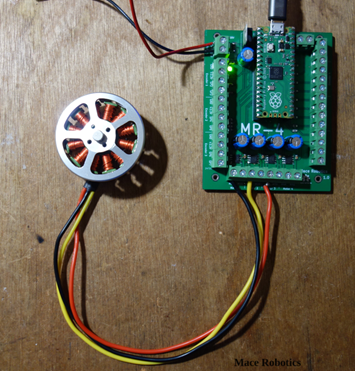
Un petit exemple sur le contrôle d’un moteur brushless avec la carte MR4 et la librairie simpleFOC (https://www.simplefoc.com/). Le contrôle du moteur BLDC est en boucle ouverte.
Logiciels & matériels nécessaires
- Logiciel nécessaire : Arduino IDE
- Carte MR4 (avec l’utilisation de Arduino IDE)
- Un moteur BLDC (7 paire de pole)
Exemples de contrôle en vitesse
Voici l’exemple de contrôle de vitesse en boucle ouverte :
[code language= »c »]
#include <SimpleFOC.h>
// BLDCMotor(nombre de paire de pole)
BLDCMotor motor = BLDCMotor(7);
// BLDCDriver3PWM(PWM des 3 phases)
BLDCDriver3PWM driver = BLDCDriver3PWM(11, 13, 14);
// velocity set point variable
float target_velocity = -20;
// instantiate the commander
Commander command = Commander(Serial);
void doTarget(char* cmd) { command.scalar(&target_velocity, cmd); }
void doLimit(char* cmd) { command.scalar(&motor.voltage_limit, cmd); }
/************************************************/
/************************************************/
void setup()
{
// initialisation en sortie des pins des 3 ponts en H
pinMode(10,OUTPUT);
pinMode(12,OUTPUT);
pinMode(15,OUTPUT);
// initialisation au niveau haut
digitalWrite(10,HIGH);
digitalWrite(12,HIGH);
digitalWrite(15,HIGH);
Serial.begin(115200);
// power supply voltage
// default 12V
driver.voltage_power_supply = 12;
driver.voltage_limit = 1;
driver.init();
// link the motor to the driver
motor.linkDriver(&driver);
// set control loop to be used
motor.controller = MotionControlType::velocity_openloop;
// initialize motor
motor.init();
// add target command T
command.add(‘T’, doTarget, "target velocity");
command.add(‘L’, doLimit, "voltage limit");
Serial.begin(115200);
Serial.println("Motor ready!");
Serial.println("Set target velocity [rad/s]");
_delay(1000);
}
/************************************************/
/************************************************/
void loop()
{
motor.move(target_velocity);
command.run();
}
[/code]
Exemples de contrôle en position
Voici l’exemple de contrôle en position en boucle ouverte :
[code language= »c »]
#include <SimpleFOC.h>
// BLDCMotor(nombre de paire de pole)
BLDCMotor motor = BLDCMotor(7);
// BLDCDriver3PWM(PWM des 3 phases)
BLDCDriver3PWM driver = BLDCDriver3PWM(11, 13, 14);
// velocity set point variable
float target_position = -20;
// instantiate the commander
// instantiate the commander
Commander command = Commander(Serial);
void doTarget(char* cmd) { command.scalar(&target_position, cmd); }
void doLimit(char* cmd) { command.scalar(&motor.voltage_limit, cmd); }
void doVelocity(char* cmd) { command.scalar(&motor.velocity_limit, cmd); }
/************************************************/
/************************************************/
void setup()
{
// initialisation en sortie des pins des 3 ponts en H
pinMode(10,OUTPUT);
pinMode(12,OUTPUT);
pinMode(15,OUTPUT);
// initialisation au niveau haut
digitalWrite(10,HIGH);
digitalWrite(12,HIGH);
digitalWrite(15,HIGH);
Serial.begin(115200);
// power supply voltage
// default 12V
driver.voltage_power_supply = 12;
driver.voltage_limit = 1;
driver.init();
// link the motor to the driver
motor.linkDriver(&driver);
// set control loop to be used
motor.controller = MotionControlType::angle_openloop;
// initialize motor
motor.init();
// add target command T
command.add(‘T’, doTarget, "target angle");
command.add(‘L’, doLimit, "voltage limit");
command.add(‘V’, doLimit, "movement velocity");
Serial.begin(115200);
Serial.println("Motor ready!");
Serial.println("Set target velocity [rad/s]");
_delay(1000);
}
/************************************************/
/************************************************/
void loop()
{
motor.move(target_position );
command.run();
}
[/code]
Liens
Utiliser la Raspberry Pi Pico avec Arduino IDE : https://www.upesy.fr/blogs/tutorials/install-raspberry-pi-pico-on-arduino-ide-software
Fin !